
Instructions for students for Eumind projects on Weebly
Dear students,
You will work in groups of 5 students on your topic.
Only one of you will have the role of editor. The editor is the only one who has access to the Weebly and he/she will publish the results of your group work on the Weebly project site.
The instructions and examples on this demo site are especially for students who are editor.
Each group will have only 1 page on the Weebly site.
It means that you publish on 1 page:
1. the presentation of the group
2. the research
3. evidence of communication
4. comparison and reflection
This format applies to almost all projects. Exceptions are On stage, Arts and Human Rights literature projects. .
Important: before you publish e.g. your group presentation on Weebly, you have to collect all the materials: photos, text, maybe video.
If you want to use videos, you will have to upload them to YouTube, so that you can embed them in your page.
Same for publishing research: prepare all materials: texts in word doc or pdf (don't upload ppt because they will only be visible for visitors of your page after downloading.
BACKUP. Take care to keep all photos and texts so that you can easily restore your page if something goes wrong. Make some screenshots of your page, so that it would be easier to fix it if you delete content by accident.
Warning: we use the free version of Weebly. It means that the editors who have access have admin rights. Technically it is possible for you to edit other pages in your Weebly project site and to add pages. Please only edit the page that your teacher has created for your group.
Step 1 Log in
Your teacher will prepare a Weebly site and will send an invitation mail to the mail address of the editor of each group of his/her own school.
The teacher will create 1 page for your group. Please don't create more pages, use only that 1 page.
NOTE: invitation mails come directly from Weebly. It often happens that it doesn't come into your default In folder. Please check spam folder and other folders (in gmail there are separate In folders for Social media / advertisement etc).
Example of invitation mail
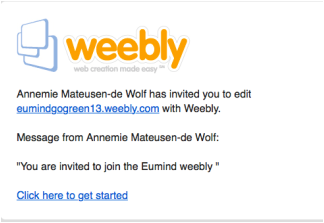
For first login you click on: Click here to get started in the invitation mail.
For next log in go to:
https://www.weebly.com/
Click on Log in (Dutch: Aanmelden) at the right top (not on: Sign up (Dutch: registreren).
If you would click on Sign up, you would create your own Weebly site. The purpose is that you work in the project Weebly of your school that the teacher has created, not in own Weebly.
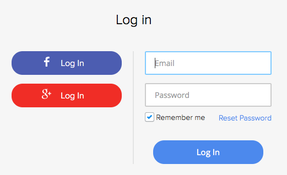
You will see the window below for Log in. Fill in and log in. Then you will see the site of your project. Click on Edit.
For next log in go to:
https://www.weebly.com/
Click on Log in (Dutch: Aanmelden) at the right top (not on: Sign up (Dutch: registreren).
If you would click on Sign up, you would create your own Weebly site. The purpose is that you work in the project Weebly of your school that the teacher has created, not in own Weebly.
You will see the window below for Log in. Fill in and log in. Then you will see the site of your project. Click on Edit.
Step 2 Layout and adding content
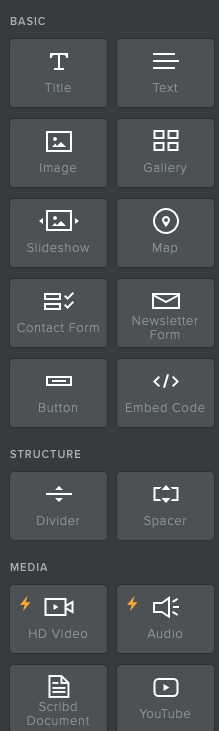
You build a page in Weebly using elements. They are like building blocks.
You can read more here
There are BASIC elements, STRUCTURE elements, MEDIA and more elements. They are all at the left side of the page that you are editing.
Once you get used to it, it will be very easy. You can easily change parts of your page, you can move an element to another part of your page.
You can put 2 or more elements next to each other, so that you have columns.
You will have only 1 page. To avoid too much scrolling, you need to make your page more compact by:
It is easy to delete an element: click on the cross in the right corner.
Examples
On this demo site you will find examples for publishing texts, adding photos, columns, YouTube videos.
Please have a good look at all examples before you start publishing.
IMPORTANT. Have a look at these pages before you start
- Click on Pages in the top menu.
- Select your page
- Click on Build in the top menu
You build a page in Weebly using elements. They are like building blocks.
You can read more here
There are BASIC elements, STRUCTURE elements, MEDIA and more elements. They are all at the left side of the page that you are editing.
Once you get used to it, it will be very easy. You can easily change parts of your page, you can move an element to another part of your page.
You can put 2 or more elements next to each other, so that you have columns.
You will have only 1 page. To avoid too much scrolling, you need to make your page more compact by:
- putting photos next to each other (2 or 3) in a column
- text of long research: put a word doc or pdf in the element Scribd Document
It is easy to delete an element: click on the cross in the right corner.
Examples
On this demo site you will find examples for publishing texts, adding photos, columns, YouTube videos.
Please have a good look at all examples before you start publishing.
IMPORTANT. Have a look at these pages before you start
- Publishing texts: click here
- Adding photos: click here
- Embedding YouTube videos: click here
Step 3 Save / Publish
Each time that you worked on your page you have to click on PUBLISH (right top of the page).
You will see the window below then and you can get a preview by clicking on the url of your weebly project site.
After each change you have to click publish again.
Each time that you worked on your page you have to click on PUBLISH (right top of the page).
You will see the window below then and you can get a preview by clicking on the url of your weebly project site.
After each change you have to click publish again.
